Proof verification
Reading proof verification
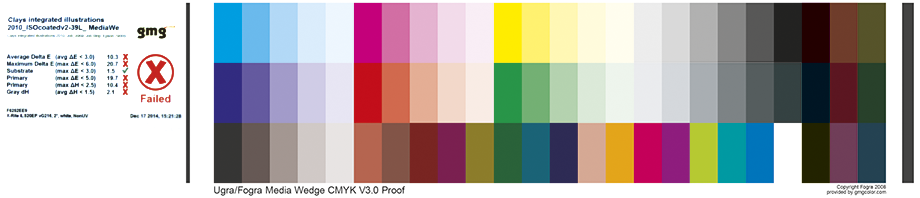
Our in-house proofer will automatically verify the colour accuracy of every proof sheet to guarantee the print simulation of its output by reading its printed colour wedge values and comparing them to standardised values. If it fails, the colour wedge will show a red cross to represent this, along with the measured tolerance values and results.
For externally supplied proofs without any verification, you may need to follow the instructions below on how to manually read the colour media wedge on the proof. Please ask Production or your technical support to help with this.
Instructions for manually measuring colour accuracy using ProofSIGN
ProofSIGN Overview
ProofSIGN is software that Production can use to assess the colour accuracy of hard copy digital proof (sometimes called Epson proofs). It allows us to accurately read the colour on the proof’s from our repro suppliers. This information can then be made into PDF reports.
The hard copy proof sheets to be measured need to have been printed and supplied with the a suitable colour bar on in order for us to be able to read them using ProofSIGN. Please read the instructions below on how to read the bar and make reports.
Any further questions about ProofSIGN or for a demonstration please contact technical support.
Before you start
Prior to making a measurement you will need:
- Proof sheets with a suitable colour bar on
- The Eye-One with the serial number 33303
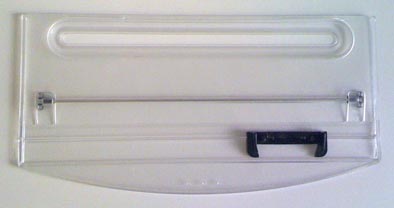
- The short Eye-One ruler
Launching, Logging In & Calibrating
Firstly, log-in to the DK Production Mac (8th floor in ‘Quiet Room’). Log-in details are clearly marked on the Mac.
Open the ProofSIGN application by clicking icon in the dock.
If the icon is missing check the ‘Applications’ folder (Finder menu > Go > Applications > ProofSIGN)

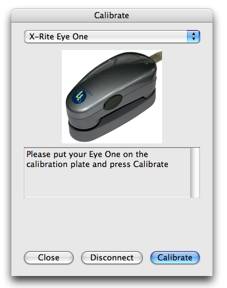
The Eye-One with the serial number 33303 must be connected to the Mac and sitting on it’s stand. When it is, press ‘Calibrate’ and wait a moment for the Eye-One to be calibrated and then click ‘OK’ for this window to close.
Choosing the correct Proof Target
You will be shown the Main Window. Choose the name of the Repro supplier in the top drop down, if not known of from another source, select ‘other’.
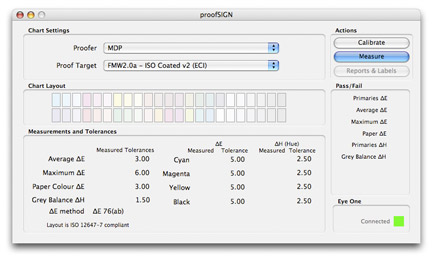
It’s important to choose the correct Proof Target from the dropdown menu. There are two parts to the choice.
The first is which bar we are checking against. The most common one is FOGRA MEDIA WEDGE 2.0a which looks like this and has V2.0a written on it.

Sometimes we receive proofs which use a 3 line colour bar. This is the FOGRA MEDIA WEDGE 3.0a which looks like this and has V3.0a written on it.

With the colour bar decided, the other decision is what paper type is the proof simulating. There are just two catagories, either coated or uncoated.
e.g. if your proof is using FOGRA MEDIA WEDGE 2.0a and simulating Coated paper then change the proof target to FMW2.0a – ISO Coated v2 (ECI).

You are now ready to make a new reading.
Making a Measurement
In the main proofSIGN window, click the ‘Measure’ button.
Position a single proof flat and directly on the white desk (with nothing underneath).
Place the Eye-One ruler on the running sheets so the top line of the colour bar is shown in the gap in the ruler.
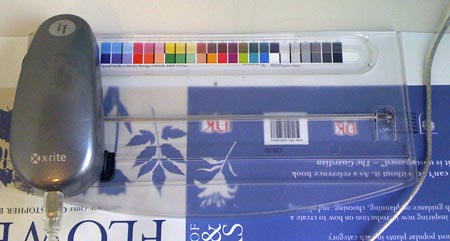
Settle the Eye-one into the black slider part of the Eye-One ruler as in this image so it will point and slide along the ruler.
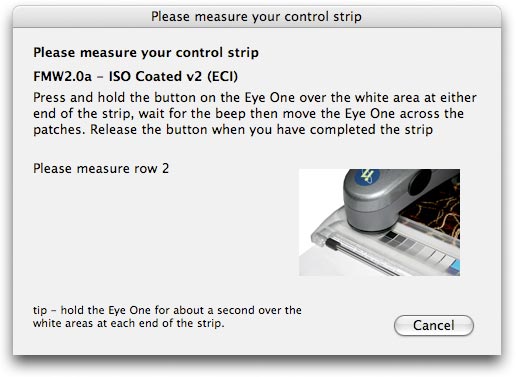
Press the Eye-One button (by your thumb) to start the reading and drag the Eye-One smoothly and steadily along the top row of the strip (not too quickly, take around 3 seconds). Move the ruler down slightly and repeat the reading for the seond row.
As the measuring window shows, It’s important to start and stop on the paper colour at either end of the FOGRA colour bar.
Click ‘Close’ button to return to the Main Window where the results of the measurements are now shown.
Results
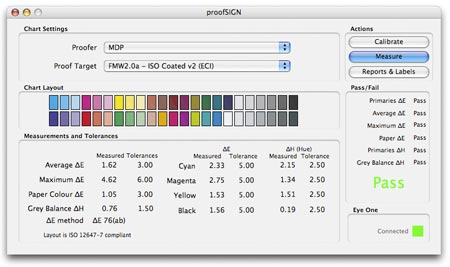
There are only two outcomes, pass or fail and this word will appear in the Pass/Fail pane in the bottom right of the main window.
A fail should be reported to your CTS, Production Editor or Production Controller.
Reporting
To make a PDF report click the ‘Reports & Labels’ button in the main window, enter a job name or reference, and then click on the ‘Save PDF Reports’ and choose to save a report to the desktop.
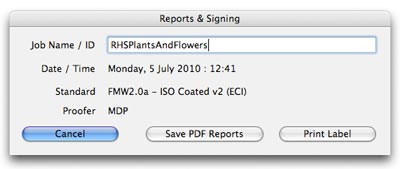
The PDF will be saved to the Mac desktop and will open for you to check. You can now move to somewhere you can access if required e.g. !MacTransfer