Illustrator artworks
Last modified: December 12, 2024
While simple shapes (i.e. small icons) can be created in InDesign, more complex artworks should be created in Illustrator, for the following reasons:
- They need to be external assets which we can store in the Media Archive for sale or reuse (these artworks will also need to be correctly named, using the DK naming convention as well as given a MA ID before importing them into InDesign). Please click here for more information.
- Storing these artworks in our Media Archive also means that we can trace the creator of the artwork through its metadata and thus avoid costly lawsuits.
- Artworks created in InDesign means giving our hi-res images free to the outside world.
- If these artworks need to be animated at any time for different products, they will need to be supplied as Illustrator files.
- They can create problems in InDesign when printing or outputting to PDF.
If you are unsure what constitutes a complex artwork, please check with your CTS team.
Illustrator Templates
(This download also includes templates at the size of some of our most common spread formats with bleed).
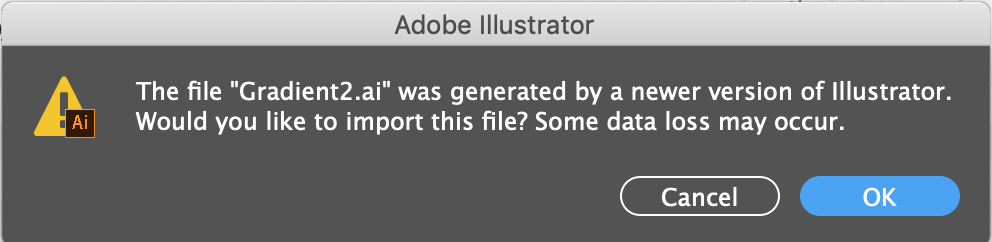
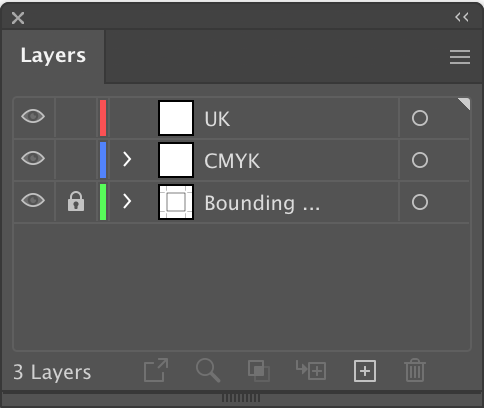
Before creating or commissioning any Illustrator artworks, it is important that you download our templates. They have been created to reflect the same layering as our InDesign documents with an added bounding box layer to stop artwork from re-positioning (an issue we found when upgrading InDesign). These layers are crucial to our workflow and if you use a different version of Illustrator to the one DK uses, you could lose those layers. Fixing this would incur extra work and potentially jeopardise our printing schedule.
Please do not ignore this message when opening our Illustrator templates. This will occur if you are using a different version of Illustrator than DK and it is likely to adversely affect our required layering:
When creating your artworks, please ensure these instructions are followed to avoid technical problems at the end of the project:
Keep complexity down
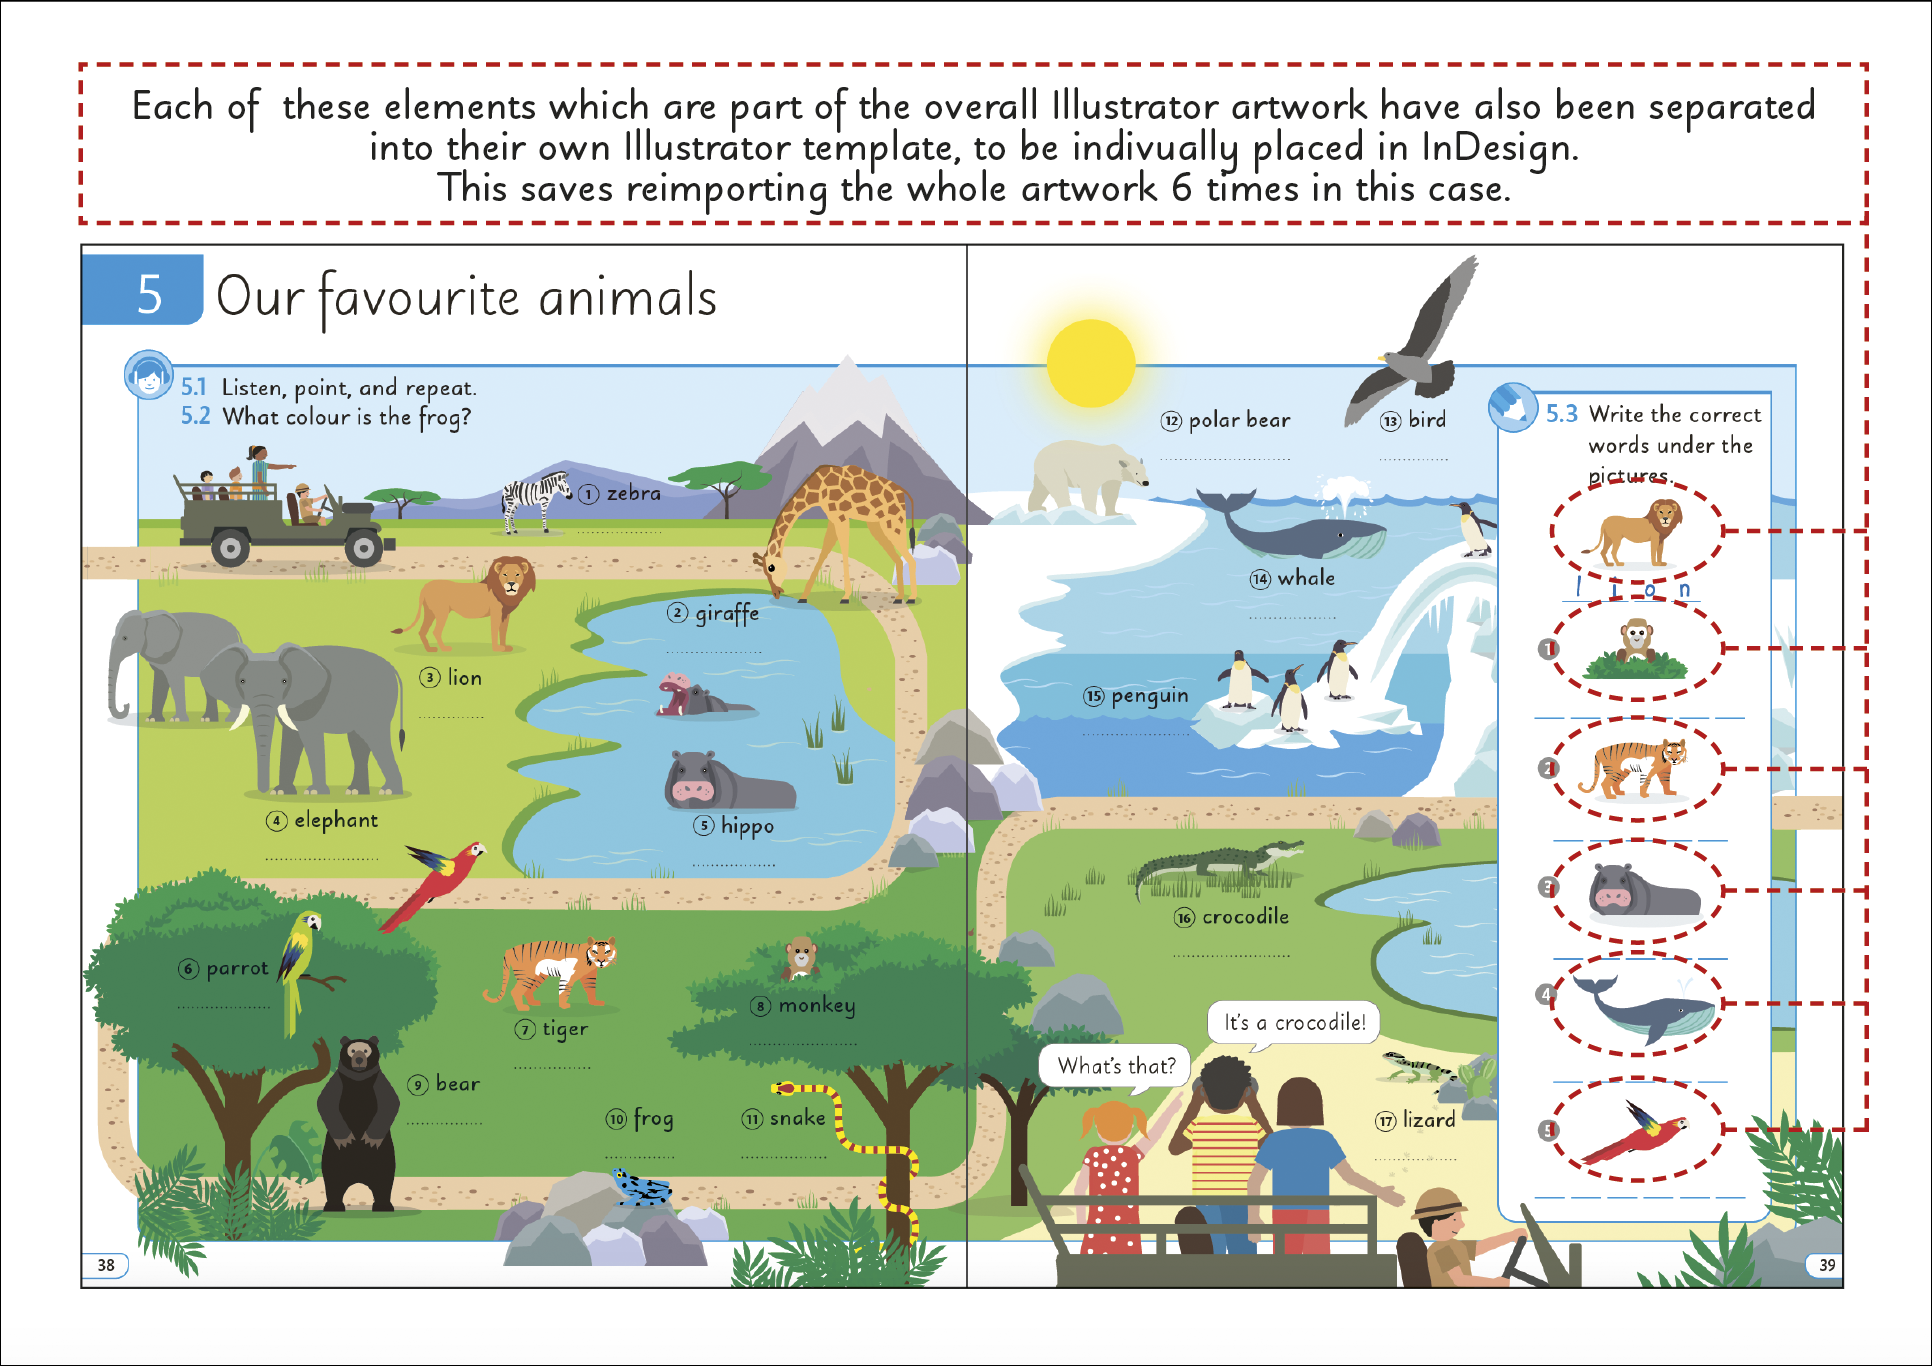
Illustrator files which contain more than one illustration cause us multiple issues, from problems in the printers RIP, downloading previews from PA or selling via MA.
It’s a problem which is impossible to automate a check for, so we rely on teams to set-up the files correctly.
Below is an example showing how a simple set of illustrations can cause large problems and it’s all down to the way InDesign handles illustrator files.
If a raster image (photo) is placed in a container and part of the image is cropped, InDesign will discard the data you can’t see. It doesn’t do this with Illustrator files. The information remains in the PDF, although it’s not visible.
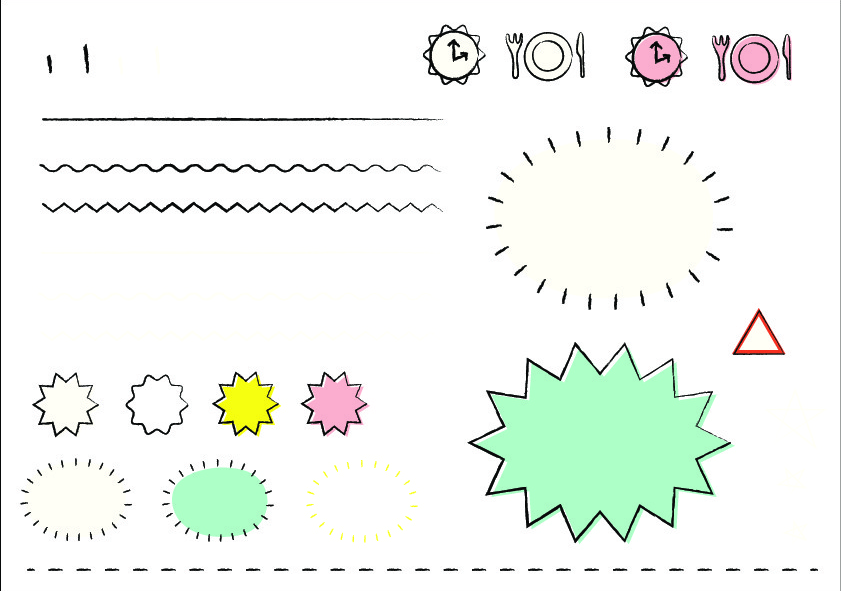
And is placed multiple times in an InDesign file like this (notice the stars, plates, triangle):
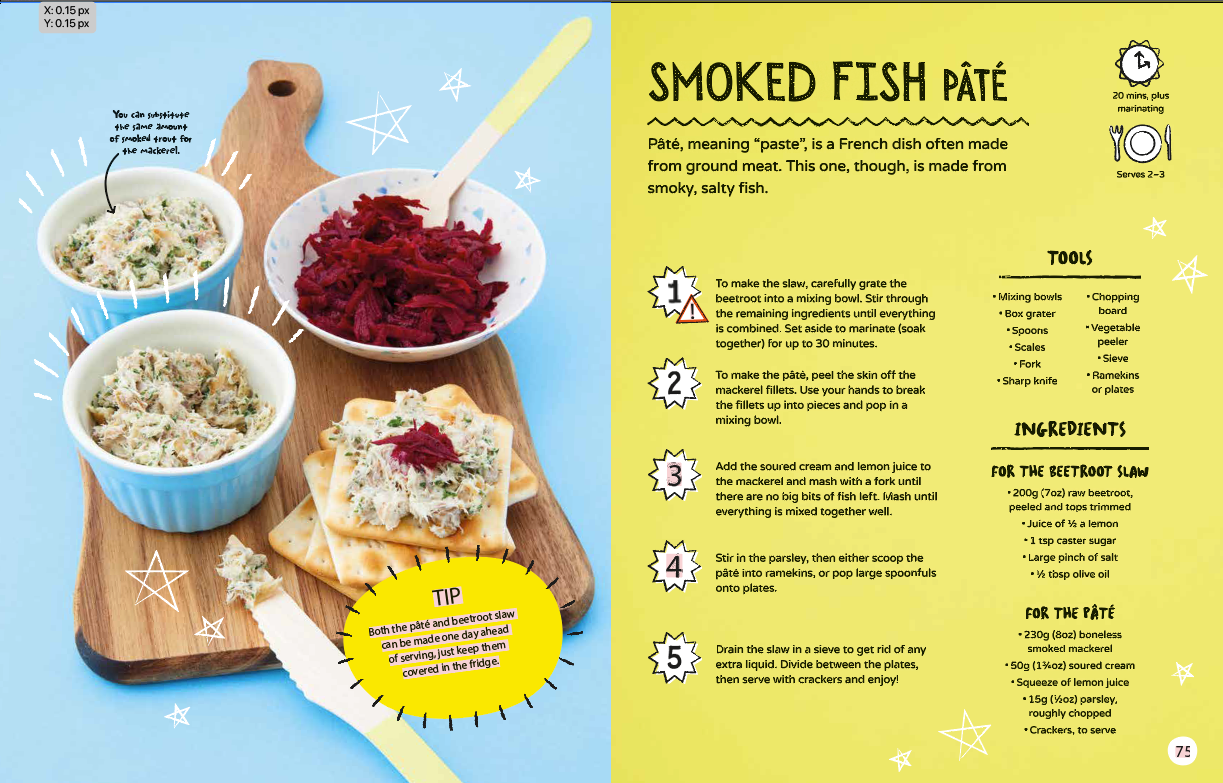
You get a PDF with vector information like this:

You can view this information by opening the page’s output PDF in Illustrator and pressing command+Y.
- Use a different template for each artwork. Different variations of a same theme (however small they are) should not be contained in one .ai file. If you need to isolate elements from an existing artwork, a new template should be used for each element. Please bear in mind that hidden information in Illustrator still forms part of the overall file size and can create problems at PDFing or printing stage, especially if this artwork is imported multiple times in InDesign.
- Use a suitable-sized template for your artwork to avoid having too much blank space as this may result in your artwork not being visible in MA.
- Do not create any extra layers apart from the 3 existing ones (except for white artworks on a white background, see below). All translatable elements should be contained within the UK/US layer. All CMYK elements should be contained within the CMYK layer.
The Bounding Box layer should not be unlocked or edited. This is how the layering should always look (even if you do not have any elements in the UK or CMYK layer).
- No parts of your artworks should extend beyond the bounding box area.
- Your artworks should not be too close within the bounding box so that the latter is not visible once imported into InDesign.
- Multiple artboards should be avoided
- Use the CMYK layer for colour elements only
- Use swatches when selecting colours
- Do not use Spot colours except in special circumstances
- Use the UK layer for all translatable elements ensuring they are all set to black and to overprint (the name of this layer should be changed to its relevant language if it is translated, i.e. US for americanisation)
- Try and use the same fonts as the ones used in the InDesign files associated with its link. If you need to add extra fonts, you should be selecting those from Monotype Fonts.
- If you are placing links in Illustrator, ensure those are embedded and are hi-res. Do not leave unused links in the document (eg: links which may have been used for image tracing should be deleted).
- Create your artworks at the relevant size for import into InDesign as scaling down too much after import may cause problems with stroke weights.
- We have created a SourceReport Illustrator which will check a lot of the above things. This should be run before artworks are submitted to our MA team and before import into InDesign.
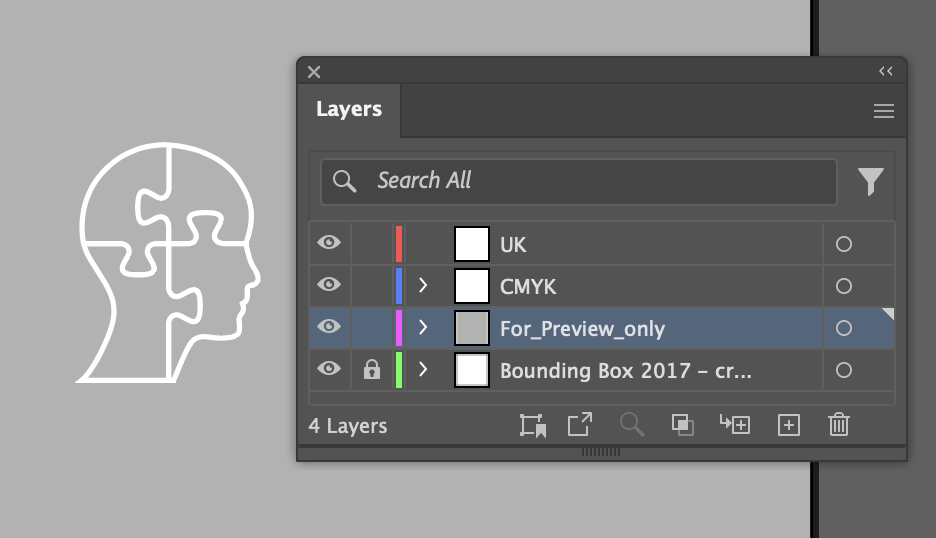
White artworks on white background
In order for white artworks to show up in our Media Archive, you will have to create an extra layer called For_Preview_only which will contain a grey background with the white artwork on top, as per this screengrab. This layer will need to be switched on when supplying this artwork to our Media Archive team, but switched off before importing the artwork into InDesign.
Smart Objects
There may be cases where an Illustrator artwork is so complex that you have problems working with the file or outputting it to PDF. If that is the case, opening the artwork as a Smart Object in Photoshop will make it easier and faster to ouput. (Please note however that we cannot do this with maps or any artworks containing translatable text as the text still needs to be separated and edited in Illustrator. This is also only in the case of unworkable artworks, .ai format with Source Report is still our preferred workflow).
Please follow the instructions below to create Smart Objects.
In Photoshop…
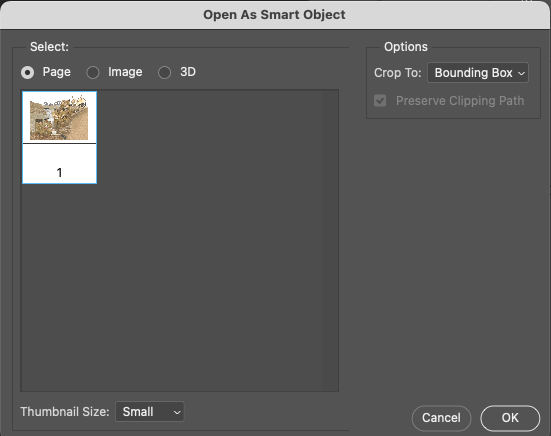
Go to File > Open as Smart Object
In the dialog panel, Select: Page and under Options > Crop To: Bounding Box, as per this screengrab.
Once the file has opened in Photoshop, you will see in the Layers panel, that your Illustrator artwork has been imported into Photoshop as a Smart Object. (The file should be saved as a .psd).
If you need to go back to the Illustrator artwork to edit it for any reason, double-click on the tiny thumbnail indicating a smart object (pinpointed by the red arrow in this screengrab).
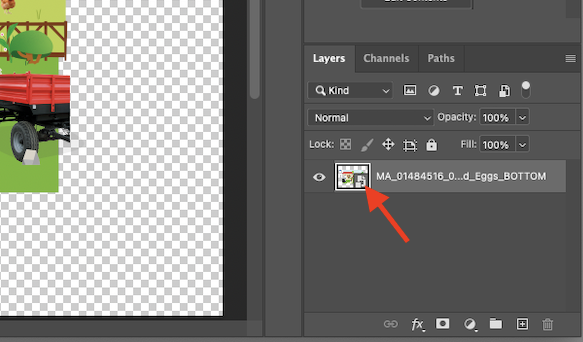
Make sure you select the same options as in these screengrabs when opening the artwork.
The artwork will re-open in Illustrator where you can make your edits. Once edited and saved (do not “Save As…” as it will break the link), the .ai will automatically update itself in Photoshop in the Smart Object layer. This means that you don’t need to keep a separate .ai file anymore until after you have run Labeller, see below.
External images placed in Illustrator
If you have placed and embedded external images in Illustrator, they will all need to have been named with their respective ID (MA or agency) so that they can all be traced. When supplying this information for picture credit, you will need to run Labeller on the Illustrator files imported into InDesign, before you import the .psd version. (We are looking at the feasibility of creating a new Labeller which would be able to trace the different image names within Photoshop so that you only work with the .psd).
Example of links imported into Illustrator with their respective IDs:
External vector images copied into Illustrator
If paths are copied and pasted from an agency vector image into an Illustrator file, you will need to ensure with your Picture Researcher that we have the necessary rights to use that image in this way. As there will be no reference to that image in the Illustrator or Indesign Links panels, you will also need to provide the agency image information to the MA team with the SourceReport Illustrator when supplying the ai.
Colour management in Illustrator
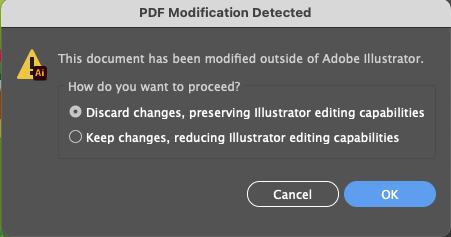
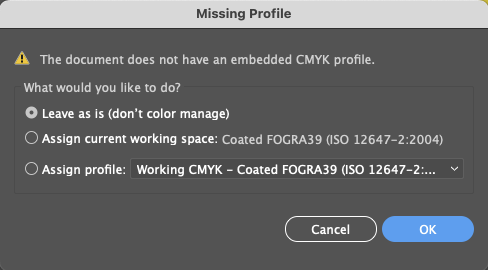
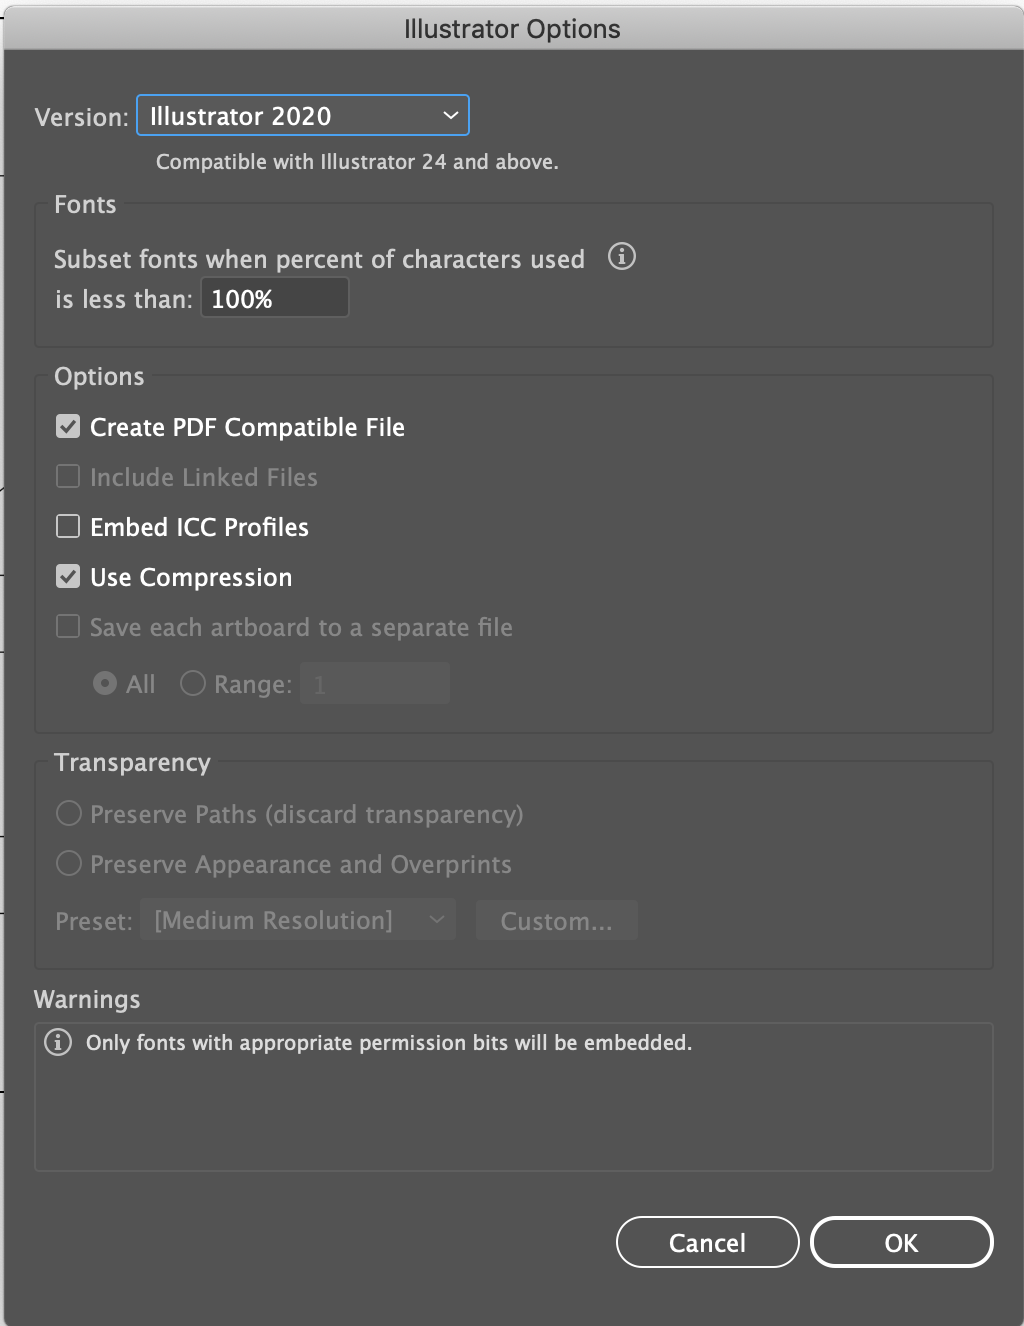
We do not colour manage our Illustrator files. To avoid unwanted colour conversions in your artworks, please ensure that when you get the message below, you follow these settings:
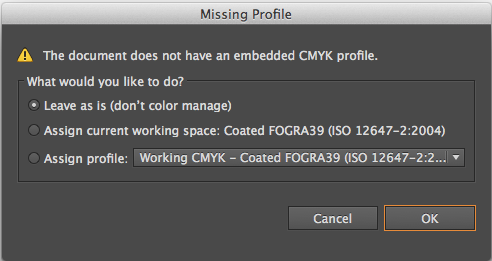
When saving your Illustrator file, also make sure, that the Embed ICC Profiles is unticked, as shown below.
Illustrator files should also be saved as .ai and not PDFs.
Using our already made templates will ensure this is correctly set up
Checking the Swatch Ink Weight
When running Source Report Illustrator on your .ai artworks, you may sometimes find that it fails the Swatch Ink Weight check. If this happens it can be difficult to find the error within Illustrator. There are however, two ways of checking this, as follows:
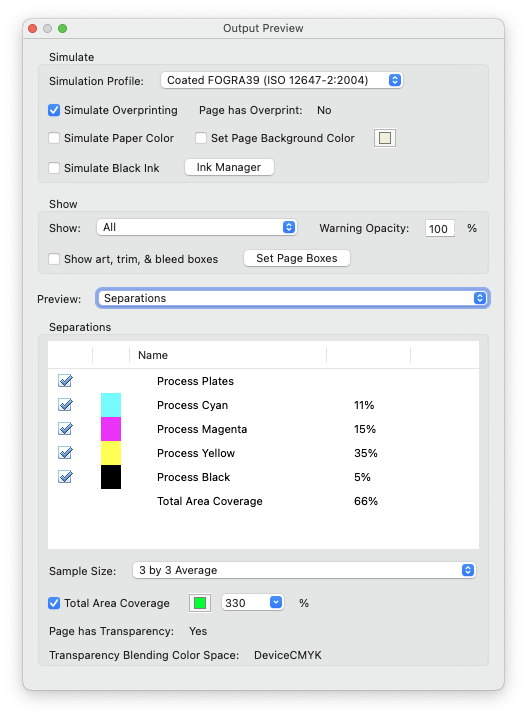
- If the artwork has not been imported into InDesign yet (i.e. before it has been given a MA ID), you can drag the artwork in Acrobat and go to Production > Output Preview > and make sure Total Area Coverage is checked. Change the percentage to 330% for coated books, as per this screengrab. If the book is uncoated, change the percentage to 300%.
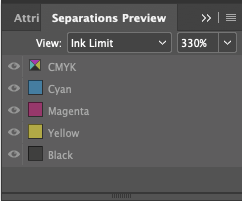
- If the artwork has already been imported into InDesign, you can check the Total Area Coverage within InDesign by going to Separations Preview > Ink Limit as per this screengrab which again shows the Ink Limit of 330% for a coated book. If the book is uncoated, change the percentage to 300%.
While this will be picked up by Production Editors when they preflight the CMYK PDFs, it is advisable to check this at the beginning so that it does not affect the printing schedule, particularly if you are using a lot of Illustrator artworks in your project.
Importing translatable artworks in InDesign
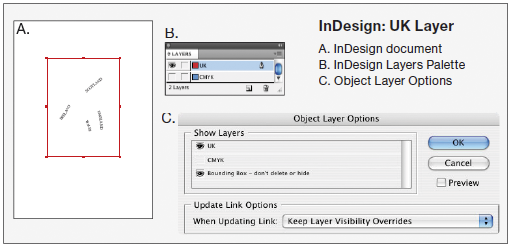
Using Object Layer Options
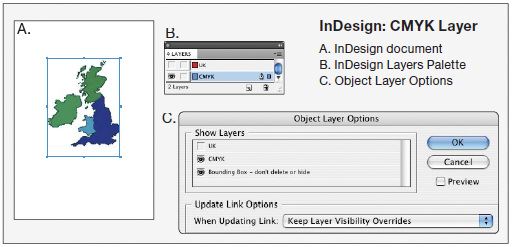
In the past we often saved two separate versions of the same illustration – one with the CMYK layer hidden, and one with the UK layer hidden. It is now preferable to have a single version of the map which then gets placed twice in the InDesign document, with different layers of the map hidden or revealed using the Object Layer Options.
Object Layer Options allow you to select and control the visibility of image layers for Photoshop and Illustrator files from within InDesign. Ideal for co-editionable artwork.
CMYK layer
- Create the frame in which the artwork is to sit on the CMYK layer in InDesign.
- Place the .ai via the ‘Place’ command, ensure that the ‘Show import options…’ box is switched on in the file browser window.
- When presented with the Import options screen select the following:
- General tab – ‘Crop to : Art’, ‘Transparent Background’ switched on
- Layers tab – ‘Show Layers’ all switched on, ‘Update Link Options’ set to ‘Keep Layer Visibility Overrides.
- When the file has been imported, go to OBJECT > OBJECT LAYER OPTIONS, switch off the ‘UK’ option, and ensure the ‘CMYK’ option is switched on. In the ‘When Updating Link’ box, ensure ‘Keep layer visibility overrides’ is selected. (Do not switch off the Bounding Box layer).
- Finally, check that the correct elements are assigned to the correct layers in InDesign by turning the relevant layers on and off.
Translation layer
- As the CMYK layer version has been imported and is in place already, duplicate the object up to the UK layer (select the frame that holds the artwork, alt+click on the object selection indicated in the layers palette and drag up to the UK layer (the hand icon will display a ‘+’ symbol).
- Go to OBJECT > OBJECT LAYER OPTIONS, switch off the ‘CMYK’ option, and ensure the ‘UK’ option is switched on. In the ‘When Updating Link’ box, ensure ‘Keep layer visibility overrides’ is selected. (Do not switch off the Bounding Box layer).
- Finally, check that the correct elements are assigned to the correct layers in InDesign by turning the relevant layers on and off.
- Turn on ‘Separations Preview’ and turn off the black plate to ensure that the black text of the object is overprinting correctly and not knocking out of the colour below.
Co-edition partners should make the necessary change to the original Illustrator file, re-save the .ai file and update the link in InDesign.
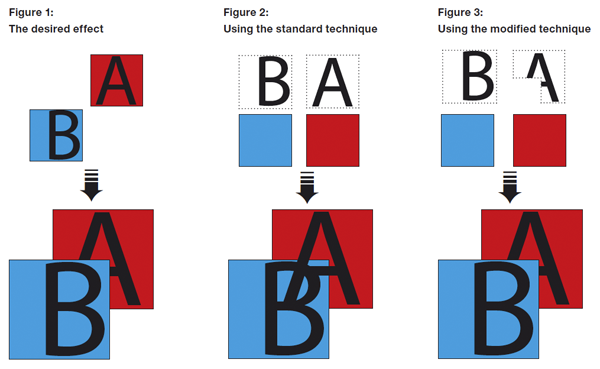
Overlapping artwork in InDesign
If translatable artworks overlap (for example, if a small locator map is placed in front of a larger map), it should look as if the artwork in front is obscuring the artwork behind it (including the text) – regardless of which layer it is on (see figure 1, below).
Unfortunately, because everything on the UK layer has to sit in front of everything on the CMYK elements, the coloured background of the artwork at the front won’t actually be able to obscure the text of the artwork ‘behind’ it. In figure 2 (below) notice how the blue panel is unable to hide the part of the letter ‘A’ that is supposed to look as if it is sitting behind it.
To avoid this, the frame that contains the translatable version of the artwork at the back must be re-shaped so that it excludes the area that overlaps the artwork in front.
To do this, duplicate and paste in place the item that is meant to appear as if it is obscuring the text at the back (in this case, the blue square) and then move it onto the UK layer. Then shift + select the text frame at the back (in this case the frame containing the letter ‘A’, so that both the copy of the blue square and the letter ‘A’ are selected.
Then go to OBJECT > PATHFINDER > [SUBTRACT] and the area of the object in front (in this case, the copy of the blue square) will be subtracted from the area of the frame containing the text behind it, so that only the correct text elements appear (figure 3).