PDF (Preflight) check
Overview
Please check that you open PDFs in Adobe Acrobat Professional, and not Adobe Reader or Preview (Mac only) as a lot of the features are not available. (Please note, these instructions are for users on Acrobat Pro 10 or later).
To check PDFs are print ready, you need to do some quick manual and automated checks.
Manual PDF checks
Colour, Separations, Inks and Overprint
These checks should be done by the user visually on screen, by selecting Output Preview (Acrobat Pro);
- Print ready colour PDFs should be tagged with a colour profile (‘Output Intent’ – usually Coated Fogra39, ISO Coated v2 or PSO Uncoated profiles) to stipulate how the PDF will be printed. If the tag is not one of these profiles, the printer will have trouble matching the PDF to a proof or previous printed sheets.
- Ink and finish separations have be named and coloured appropriately.
- Overprint check for print finishes set to overprint and inks to knockout (or where they should not) otherwise the print supplier will have problems with producing good quality work.
More information can be found on the Output Preview (Acrobat Pro) page.
Dimensions and Measurements
- Check the spine width measurement for covers and jackets
- Check the Trim Page Size (TPS)
Use the Measuring Tool under Analyze in the Tools menu (Tools > Analyze > Measuring Tool), to measure distances on the PDF. Click the first point to measure, then click the second point, and finally a third click to get the actual distance.
For exact trim page size measurement use the ‘Crop Pages’ option under Pages in the menu (Tools > Pages > Crop) and double click on the PDF page to bring up the Crop Pages dialog box to display its TrimBox information. Use the drop down to select Trim size (see screen grab).
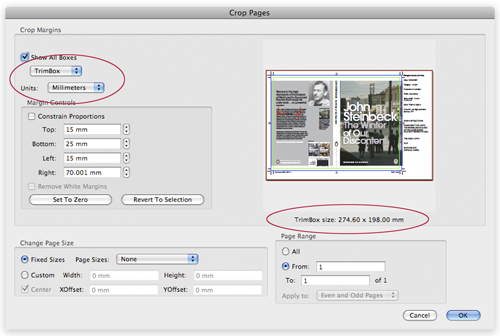
Crop Pages dialog window
Automated PDF checks (Preflighting)
Installation
Please note that if you are running Fuse, it will already have downloaded these preflight profiles into Acrobat on your Mac, you do not need to download these manually again!
- Download and save the compressed .zip file containing all our preflight settings/profiles to your desktop
- Mac users – double click on your downloaded .zip file to uncompress (this creates a new folder)
- PC users – right click on your downloaded .zip file, and from the list select Extract All to uncompress the settings (this creates a new folder)
- In Adobe Acrobat Pro, open any PDF and under the Tools option select Print Production then Preflight to bring up the Preflight window
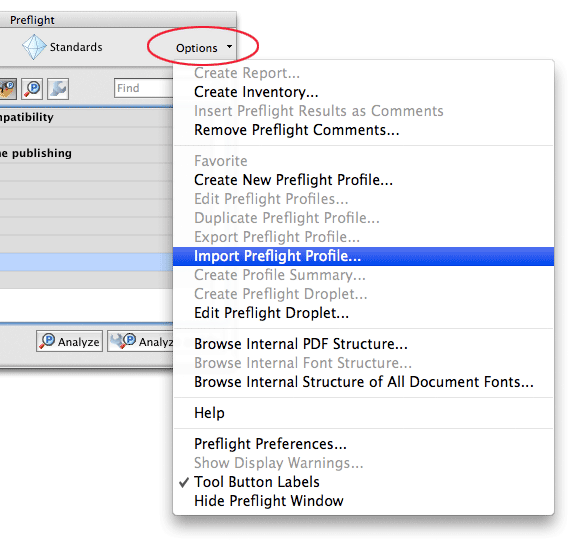
- To load preflight profiles select Options in top right of Preflight window and choose Import Preflight Profile…
- Options >

- Select the preflight profile you want to load from the uncompressed settings folder and click OK. Repeat for each preflight profiles as you can only load one at a time.
- All preflights by default, will be available in the Preflight window under Imported Profiles
The profiles will now be available and remain loaded into Acrobat, and will be ready to use every time Acrobat Pro is launched.
Now these profiles are loaded into Acrobat Pro they can be used to check open PDFs, or to create a ‘droplet’ in order to check multiple files at once.
Creating PDF preflight droplets
Droplet are a quick and easy way to Preflight multiple files in one go.
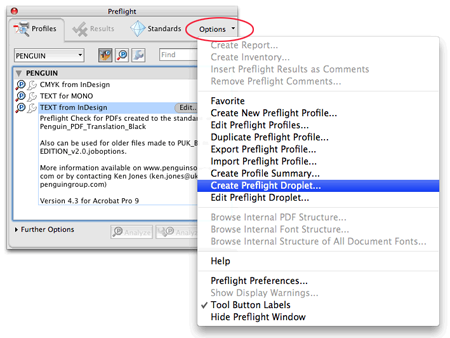
After installing the preflight checks into Acrobat Pro (see above), choose a Preflight profile and from the Option menu, select the Create Preflight Droplet…
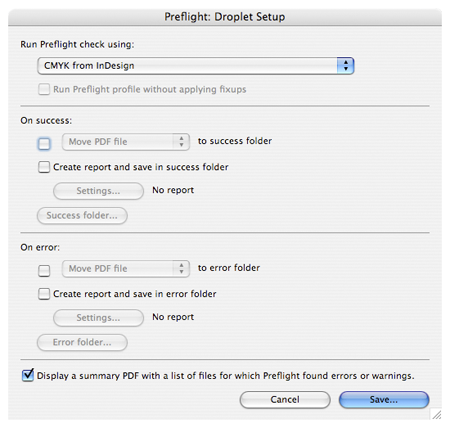
Then choose so save the droplet on your desktop with the following options:
You can now drag groups of PDF files and drop onto the droplet on your desktop
Tips:
- On a PC, if you see an error when dragging lots of files try running a smaller amount of files on the droplet.
- Files can be checked from a server, they don’t need to be copied first.
- Don’t choose to move or copy any files, just choose to display a summary PDF (see pic with options above)
- Acrobat does not need to be opened before running as droplet, it will be opened in order to run the files through the preflight.
Understanding PDF preflight report results
 | ErrorsPreflight errors show major problems in PDFs which will cause production problems or result in image quality and colour problems when printing. These problems need to be fixed in the origination files (e.g. InDesign, Photoshop, Illustrator) and the PDFs remade and rechecked. |
 | WarningsPreflight warnings show potential problems in PDFs which need to be checked in the PDF files. They give us clues that the PDFs may not have been prepared following our guidelines and after checking, this information should be fed back to the PDF creator for use in the future. This is especially true on PDFs created for uncoated paper where the ink limit is much lower. |
 | InformationPreflight info are to highlight things in PDFs which may be a mistake but also may have been done intentionally. This may be an alert that translation text has moved to the colour layer and should be followed up. |
The table below lists preflight error descriptions, and possible fixes to help eliminate PDF Preflight fails at Production stage before they are sent to press.
There are no bleed or stroke weight checks in our PDF Preflight, but SourceReport does have checks for these, as follows:
Bleed 3mm / Bleed 5mm / Bleed 15mm / Bleed Min 15mm / Slug 30mm
Black Stroke Weights Minimum / Black Stroke Weights Recommended
Colour Stroke Weights Minimum / Colour Stroke Weights Recommended
| Preflight Check | Result | Description | Possible Fix | SourceReport Checks |
|---|---|---|---|---|
| PDF is not compliant with PDF/X-1a(2001) or PDF/X-4 | Fail | COLOUR (CMYK) PDF was exported from InDesign/Quark using the wrong PDF version for CMYK PDFs and will not print correctly | Remake the PDF using the InDesign export settings for CMYK PDFs or Jacket PDFs | n/a |
| PDF version NOT above 1.3 | Fail | TRANSLATION (TEXT) PDF was exported from InDesign/Quark using the wrong PDF version for Text (Translation) PDFs and will not print correctly | Remake the PDF using the InDesign export settings for Text PDFs | n/a |
| Fonts NOT embedded | Fail | A required font is not embedded (contained) within the PDF, and will not display or print correctly | Remake the PDF with all the required fonts loaded in the InDesign, Illustrator or Photoshop files used | All Fonts Active |
| Bitmap Image Resolution under 900ppi | Fail | The resolution (quality) in a bitmap (B/W) image is below exceptable quality | Resize/replace image in InDesign, and remake the PDF | Medium Res Bitmap Images High Res Bitmap Images |
| Colour Image Resolution under 250ppi | Fail | The resolution (quality) in a colour image is below exceptable quality | Resize/replace image in InDesign, and remake the PDF | Medium Res Colour Images High Res Colour Images |
| Greyscale Image Resolution under 250ppi | Fail | The resolution (quality) in a bitmap (B/W) image is below exceptable quality | Resize/replace image in InDesign, and remake the PDF | Medium Res Grayscale Images High Res Grayscale Images |
| NOT Process Black Only Inside Bleed | Fail | A colour other than Process CMYK (Usually Registration or Pantone) has been used within the PDF | Check InDesign linked files for unwanted spot colours using Separations Preview and convert unwanted Pantone colours using Ink Manager, then remake the PDF | All Images Black Translation Images Black Translation Objects Black Translation Text Is Black Translation Tables Black |
| No white objects | Fail | An image, graphic or text object is coloured with the white swatch or has a white background that will effect the CMYK PDF when merged in co-edition workflow | Remove the white object on the Translation layer and remake the Text PDFs | Translation Objects Blend Mode No White Swatch No EPS Images |
| Object fill is NOT overprinting OR Multiply | Fail | InDesign TEXT layer fill colour is NOT set to Overprint or Multiply and will affect the CMYK PDF in co-edition workflow | Set the objects fill colour to overprint or Multiply in InDesign, and remake the Text PDFs | Paragraph Style Overprint Translation Images Overprint Translation Objects Overprint Translation Text Overprinting Translation Table Overprinting |
| Object Stroke is NOT overprinting OR multiply | Fail | InDesign TEXT layer stroke colour is NOT set to Overprint or Multiply and will affect the CMYK PDF in co-edition workflow | Set the objects stroke colour to overprint or Multiply in InDesign, and remake the Text PDFs | Paragraph Style Overprint Paragraph Style Rules Translation Objects Overprint Translation Tables Black |
| Blend Mode not Normal or Multiply | Fail | InDesign text or object has a Blend mode that will affect the CMYK PDF in co-edition workflow | Set the text or objects blend mode to Normal or Multiply (not both) in InDesign or Illustrator, and remake Text PDFs | Translation Objects Blend Mode |
| Registration in trim | Fail | An InDesign linked file or object within the InDesign trim area is coloured Registration (ie 400% ink), and will not print correctly | Check and fix the InDesign linked file or recolour object, then remake the PDF | No Registration Objects No Registration On Page |
| Spot colour | Fail | Spot colours have been found | Recolour the offending text or object with Process CMYK if necessary, and remake the PDF | No RGB Swatches Only One Spot Swatch No Penguin Orange 1505 |
| Trim Box NOT Present | Fail | The PDFs Trimbox is missing. PDFs need to have TrimBox included for automatic imposition | Remake the PDF using the InDesign export settings for CMYK PDFs, Jacket PDFs, or Translation PDFs | n/a |
| More than one page in PDF | Fail | Single page PDFs are preferred. It makes it easier to check which pages are supplied and to make individual page changes | Remake the PDF using the InDesign export settings for CMYK PDFs, Jacket PDFs, or Translation PDFs | n/a |
| InDesign CS4 version before 6.0.4 | Fail | PDFs not produced by InDesign 6.0.4 (CS4) or later versions, can cause problems at some printer’s RIP | Remake PDF using InDesign CS4 or a later version | n/a |
| Output intent is NOT FOGRA27 or FOGRA39 | Fail | Our colour management policy is to work to FOGRA39 for InDesign CS4 (and above) generated PDFs and FOGRA27 for InDesign CS2 & CS3 generated PDFs | Check PDFs are not for uncoated stock. Remake PDF using InDesign CS4 or a later version and correct colour management setting | Coated FOGRA39 Uncoated FOGRA29 Image Colour Modes Image Colour Profiles |
| Fill Total Ink Weight over 335% | Warning | The offending objects fill (background) has over 335% total ink coverage or contains very high amounts of CMYK ink on top of each other, and may cause problems when printing | Use Acrobat Output Preview to find the offending fill area in PDF. Edit the offending image/object to under 330% using InDesign or Photoshop | Swatch Ink Weight |
| Stroke Total Ink Weight over 335% | Warning | The offending objects stroke (outline) has over 335% total ink coverage or contains very high amounts of CMYK ink on top of each other, and may cause problems when printing | Use Acrobat Output Preview to find the offending stroke area in PDF. Edit the offending image/object to under 330% using InDesign or Photoshop | Swatch Ink Weight |
| Black only text used | Info | Possibility of translatable black text used in CMYK PDF | Move offending text to text layer if necessary in InDesign, and remake CMYK PDFs | No Text On CMYK Layer |
List of PDF Preflight checks
| Page Type | InDesign Export to PDF | Acrobat Preflight Check |
|---|---|---|
Inside Co-ed ColourContains content that remains the same across languages, common images and colour objects. Colour Management for Coated and Uncoated papers. | Penguin_PDF_CMYK_Coated39 or Penguin_PDF_CMYK_Uncoated47* | CMYK from InDesign |
Inside Co-ed TranslationContains content that changes per language, including translatable text and objects, coloured process black only. No Colour Management. | Penguin_PDF_Translation_Black | TEXT from InDesign |
Inside ColourContent uses 2 or more colours and contains all text and image content, including Pantone and finishes. Colour Management for Coated and Uncoated papers. | Penguin_PDF_CMYK_Coated39 or Penguin_PDF_CMYK_Uncoated47* | CMYK from InDesign |
Inside MonoContent is always process black, containing text and integrated images. Integrated images must be below 80% max. tint to avoid fill-in. No Colour Management. | Penguin_PDF_Mono_Typesetting | TEXT for mono |
Inset Mono/ColourContent contains colour and/or mono images and text printed on coated paper. Colour Management for Coated papers. | Penguin_PDF_CMYK_Coated39 | CMYK from InDesign |
Jacket, Covers, PLC (printed non UK)Process CMYK and Pantone colour inks, and all finishes. Colour Management for Coated and Uncoated papers. | Penguin_PDF_Jacket_Coated39 or Penguin_PDF_Jacket_Uncoated47* | CMYK from InDesign |
Jacket, Covers, PLC (printed Clays UK)Inks only – CMYK Process and Pantone. Colour Management for Coated and Uncoated papers. | Penguin_PDF_Clays_Covers | Cover Inks files for Clays v1.2 |
Jacket, Covers, PLC (printed Clays UK)Finishes only – Spot lam, emboss, foil. No Colour Management. | Penguin_PDF_Clays_Finishes | Cover Finish files for Clays v1.2 |
Printing out PDFs
We recommend that if you are planning to check a colour PDF by printing it out, that you switch on the Simulate Overprint checkbox in the Print window to get a more accurate rendition. Please note, laser printer colour output is inaccurate and must not be used to judge final colour work.
Setting up Acrobat
Acrobat preferences
Preferences only need to be set once. Find the Preferences option in the menubar at the top of your screen.
- Select Page Display (in long list on left of the window) and in the main window, tick on Show art, trim & bleed boxes and Show transparency grid (shows checkerboard, switch on/off at any time) and further down in the dropdown menu next to Use Overprint Preview: set to Always
- Select Units & guides (in long list on left of the window) and choose Millimeters
- Click OK to finish
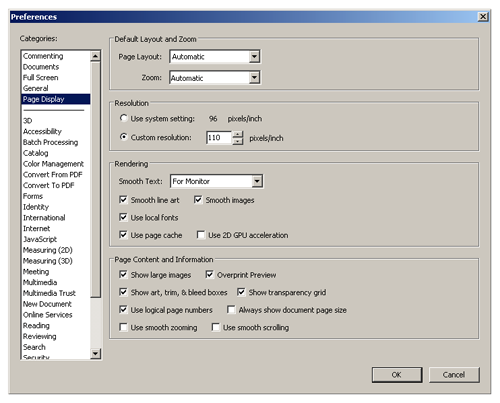
Preferences dialog window
Acrobat tools
Tools also only need to be set once.With a PDF open, click on Tools in the top right corner of the window, then on the small page icon (circled) select only the recommended tools shown in the list (Content Editing, Pages, Print Production, Analyze). If you only have these tools visible, its much easier to find what your looking for in Acrobat Pro.

Troubleshooting
Thin white lines
You may occasionally see very thin lines over graphics that can’t be found in the original image file. Zooming in and out still displays the offending lines, but they do not get bigger when magnified. This is almost certainly Acrobat displaying the ‘stitching’ between transparency objects with a PDF.
These lines should be ignored as they will not print, but for peace of mind, you can switch off the setting that picks up these lines in PREFERENCES > [PAGE DISPLAY] and under the Rendering heading, uncheck “Smooth line art” and “Smooth images”.
Colour Management
If the PDF does not have an Output Intent,
Properties
Document properties can display;
- File name that created the PDF
- Creation and modification date of the PDF
- Application that created the PDF
- PDF version
Access the PDF properties window using FILE > PROPERTIES in the menubar.
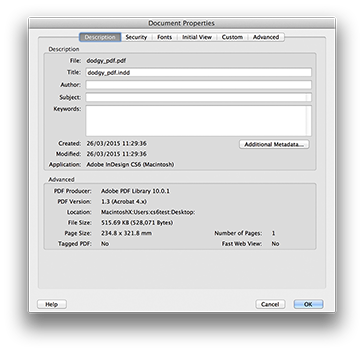
With a file open, show the ‘Document Properties’ dialog box and choose the ‘Description’ tab.
- All PDFs supplied should be generated from InDesign, unless we are using very old QuarkXPress files. Check that the application states Adobe InDesign and its version.
- Rather than sending the file to another application (e.g. Acrobat Distiller) we specify that PDFs are exported directly from InDesign. If this has happened the PDF Producer will say ‘Adobe PDF Library’.
- The PDF Version should follow our standard PDF export settings.
If any of these points are not right then we know that the PDF has not been made to our PDF Presets and you should simply ask for it to be resupplied.