Sticker book procedure
Last modified: December 14, 2023
Overview
We need to make sure that all our files for titles with sticker sheets are set-up in a way that will enable the printer to make an accurate cutter guide on press. Sticker books will usually have a front section where the reader will place the stickers, these pages are referred to as Gallery Pages. After the Gallery Page section are the Sticker Sheets which have blank backs, and use thicker, sticker paper sheets.
- To avoid any pagination errors, we must supply PDF files for all pages, even if they are “blank” or are merely a “sticker back” sheet. This means creating an InDesign file to cover every page and/or spread.
- All images whether .psd or .ai should be named with their correct ID prefix and be imported individually into InDesign. Their respective cutter guides should be created in InDesign as per the instructions below.
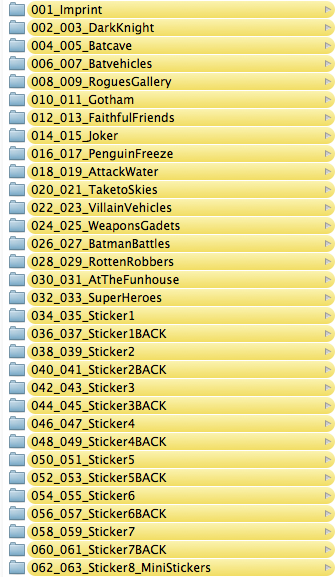
- As per current SourceReport requirements, each InDesign file must sit within a folder of exactly the same name, minus the .indd extension – regardless of whether there is a Links folder.
- EXCEPTIONS – The only exceptions to this pagination formula are the 16pp (stapled) sticker books. The sticker pages here are not paginated and are “tipped in” at the printer. “Sticker Spread 1 and Sticker Spread 2” accordingly would suffice.
File setup
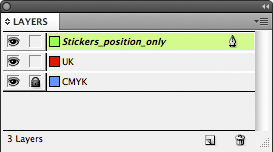
As per usual co-edition page set-up, we should have a CMYK layer (containing all images and objects common to all) and a translation layer (Usually “US” or “UK”; placed on top, containing text and elements for that particular edition only).
Gallery pages
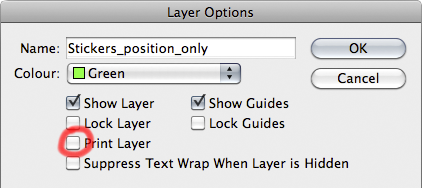
The gallery pages will have a third layer, for sticker positional reference only. This layer should be set to non-print, and be called Stickers_position_only.
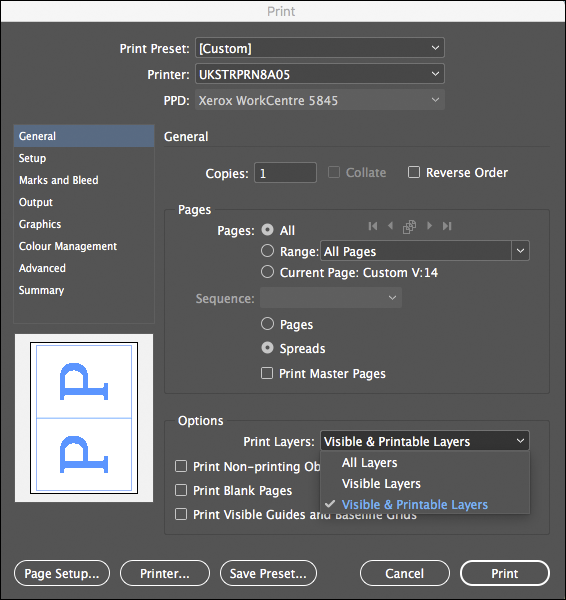
Use the Layer Options panel to switch off printing for this layer. When printing your spreads, also make sure that the correct Layers are selected in the print dialog box. If you don’t want to print the Stickers_position_only layer, ensure that Visible & Printable Layers is selected in the Print Layers: option. If you want to print it, then select All Layers.
The positional layer is useful as it shows editors, designers and co-edition partners where the stickers will be placed.
Sticker sheets
Sticker sheets need a cutter guide for the printer. We should keep this on the CMYK layer for ease of batch PDFing and consistency but there should be a spot colour swatch so that the CMYK PDF will contain a spot layer ink called Cutter Guide.
Please note that having the cutter guide on the CMYK layer is an exception from the cutter guide rules.
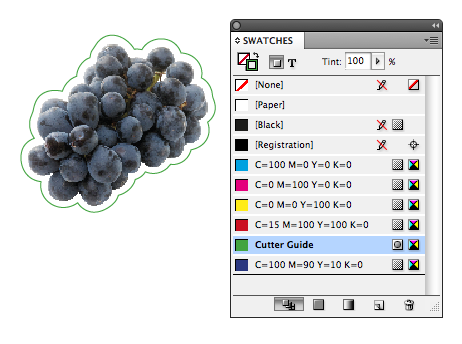
A cutter guide, also known as a die cut, cuts paper to almost any shape with a registration accuracy of 2mm. Care should be taken not to design sharp angles or intricate shapes that require exact accuracy or registration.
The characteristics of a cutter guide are as follows:
- Coloured with a swatch named Cutter Guide and as spot colour set to 100% tint.
- With a solid stroke (not dotted) set to 1pt with no fill colour.
- Must overprint (does not knockout to white).
- Remember that every sticker has three elements: its positional “silhouette” on the CMYK layer of the gallery page, its sticker positional on the non-printing layer of the gallery page, as well as its image and cutter guide on the sticker pages. If the image changes at any point, all elements need to update accordingly.
Printer requirements for sticker sheets
Additional sticker cutter guide characteristics are as follows:
- Should not be closer than 3mm to the sticker image to produce white space between the image and cutter guide. If there’s a copyright text line next to the image, you might want to leave 4-5mm, for example.
- Be at least 15mm from the spine and edge of the trimmed page.
- Gap of at least 3mm between stickers unless they butt up to each other i.e. on the “mini sticker” pages only.(“Mini sticker” pages refer to sticker spreads which feature pages filled entirely with squared-up mini stickers.)
Duping and Spin-downs (DK titles only)
If the sticker book is likely to have a UK or US “spin-down” edition/s, then the in-house editor or designer will inform the pre-production producer when files are ready for duping. (For Anglicization or Americanization.)
- Spin-downs refer to a reduced page extent edition of the book. In Licensing, for example, the US usually do an Ultimate Sticker Collection of 96pp. The UK will often then do two Ultimate Sticker Book titles, each of 32pp, re-using pages and spreads but repaginating. These UK titles are known as the spin-downs.
- The Pre-Production producer will dupe the files and place the newly generated dupes into the respective book folder for the edition. The editor/designer will then re-name and re-paginate the InDesign files accordingly. All parties concerned should have a flatplan for reference.
- All CMYK PDFs (and text PDFs) should then be freshly generated for the new editions. CMYK PDFs should not be re-used and re-named, as they contain embedded pagination info which could confuse the printer. Any amends hereon in the “master” edition will need to be applied to the “spin-down” accordingly.
- All links will also need to be duplicated, and re-packaged and named properly to pass the SourceReport.
Creating gallery spreads and sticker sheets
Gallery spreads
(For Illustrator artworks, taking note of the printer requirements above, you can draw your cutter guide path in InDesign).
- Import image onto CMYK layer.
- Select image on the CMYK layer, and In OBJECT > CLIPPING PATH > OPTIONS > PHOTOSHOP PATH, turn on the desired path. (If you have VERY complex paths, you may wish to create a simpler one solely for the purpose of these guides). Duplicate (copy and paste in place) this onto the Sticker_Position_only layer. You can hide this layer for the time being.
- With your image on the CMYK layer selected, go to OBJECT > CLIPPING PATH > CONVERT CLIPPING PATH TO FRAME.
- Delete the image and fill the shape with the desired CMYK swatch, pattern, or image. The next steps will create the final sticker cutter template. Depending on the style of your book, this can also be used for a second colour fill on the CMYK layer.

- Switch on the Sticker_Position_only layer.
- Create a 3mm circle and fill it with any colour. (This will only serve as a guide for your cutter guide). Place this touching any outside edge of your image.

- Select the image and In OBJECT > CLIPPING PATH > OPTIONS > PHOTOSHOP PATH, change the Inset Frame to create an offset which will reach the outside edge of your circle guide (this will depend on your image, but will need to be minus mm, eg -5mm).
- With your image still selected, go back to OBJECT > CLIPPING PATH > CONVERT CLIPPING PATH TO FRAME. Fill the frame with “Paper” to simulate the Sticker. Finally delete the 3mm circle.
 Optional steps for the gallery spreads
 - If you require another colour fill on the CMYK layer, which matches the Sticker positional, simply copy and paste in place the Positional guide and move this to your CMYK layer.
- Delete the Image from the frame and fill with the desired colour. Send this behind the first Gallery frame.

Sticker sheets
- Copy and paste the image from the Stickers_position_only layer from the gallery spread to the sticker sheet on the CMYK layer.
- Add die cut stroke (1 pt, spot colour, set to overprint). Setting up a stroke object style for this is recommended to speed up the process of creating many stickers.
Handy object styles for sticker books
Creating a path in Photoshop
In order to use a Sticker Book object style in InDesign you will need to first create a path in the Photoshop file. Make sure to keep your path simple, close to the edge of your actual image (not the imagined cutter guide) with no sharp angles or intricate shapes. These cannot be maintained when cutting and can cause stickers to tear when being peeled.
Download file
Click on the link below to download the template containing the Object Styles.
Load Object Styles
Open your InDesign file and go to your Object Styles palette (Window>Styles>Object Styles). Select Load Object Styles from the palette option, then select the downloaded file and click Open. Check the Object Styles you wish to load and click OK (don’t check or load the Basic Graphics Frame or Basic Text Frame Object Styles).
Applying a cutter guide Object Style in InDesign
• Place your image into your InDesign document at your desired size and position (on the CMYK layer).
• Click on your image with the Selection Tool (black arrow). Go to the Clipping Path Options (Object>Clipping Path>Options…). Change the Type to Photoshop Path, then go to Path and select the path you created.
• Reselect your image with the Selection Tool (black arrow). Convert your Clipping Path to a frame (Object>Clipping Path>Convert Clipping Path to Frame).
• Click on your image with the Selection Tool (black arrow). Select your desired Object Style (Window>Styles>Object Styles).
Object Style examples
Cutter_Guide – This will place a spot colour stroke called Cutter Guide 3mm out side of an image frame.

Cutter_Guide_Reverse – Sometimes the Cutter_Guide object style will not work correctly and align the cutter guide on the inside of the image frame. If it does simply use the Cutter_Guide_Reverse object style which will realign it to the outside.

Sticker_Position_Guide – This will place a 3mm white (paper) stroke around an image frame.

Sticker_Position_Guide_Drop_Shadow – This will place a 3mm white (paper) stroke around an image frame and include a black (K) only, feathered drop shadow.

When the Object Style appears incorrect
Sometimes the path does not behave properly and the Cutter Guide will appear on the inside once the Object Style is applied. If this happens, simply select the Cutter_Guide_Reverse Object Style.
Adjustments after the Object Style is applied
You can use the Direct Selection tool (white arrow) if you wish to manually adjust the Cutter Guide shape. Simply drag the points on the image frame.
If you need a larger gap between sticker and cutter guide, just increase the stroke width.
If you resize a sticker after you have applied the Cutter Guide Object Style, make sure you clear overrides in the object styles to maintain the 3mm gap between the image and the Cutter Guide.
Some images are not suitable for use with these Object Styles
Certain images can prove to be very difficult to tidy up. If this is the case, simply draw the cutter guide manually as described further up in this post.
The CTS team would like to thank Lisa Robb who devised the method and original Object Style, used to create the ‘Handy Object Styles for Sticker Books’ section of this post.