DK app tiles
A new app template and design guidance have been created to ensure continuity in the look and feel of DK app tiles across devices (Android and Apple) and products. Please note: all new App tile designs should come through the jacket process for sign-off to ensure the correct people have had visibility of them before submission.
Workflow
Design and approval of the app tile should be carried out by the creative team.
Processing of the resultant PSD file to create assets should be carried out by the digital producer looking after the project.
Design
Guidance on the design of your tile can be found in this downloadable PDF.
The PSD template
The psd template for the app tiles (DK_App_tile_template_v1_1.psd) is supplied in this download. This template has been set up so that all necessary versions of the app tile can be created from a single psd file that has the correct tile shapes, keylines and borders and the correctly sized and positioned DK logo.
Why do we need different versions of the app tile?
We need several different versions of the tile because of the way Apple and Android process the files.
- When we submit a tile to Apple the file must be supplied squared up. Apple then process this file to add curved edges and also apply a fine grey keyline so that white tiles can stand out against the background on store.
- When we submit a tile to Android, there is no additional processing to change the shape or add a keyline. To make the tile consistent across Apple and Android devices we have to do this ourselves.
- App tiles are also sometimes requested for marketing purposes. In this case we supply a rounded version of the tile with keyline and drop shadow added.
Using the PSD template (designer)
When using the template please follow these guidelines:
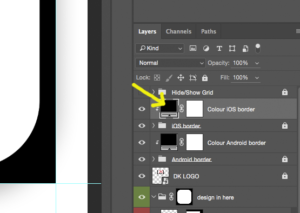
For the iOS border
- Please do not change the locked “iOS border” folder.
- If you wish to change the colour of the iOS border please can you make the change in the “Colour iOS border” layer. As this is a gradient fill, to achieve a solid fill you will have to match the colour at both ends of your gradient (see notes below on changing the gradient fill).
For the Android border
- Please do not change the locked “Android border” folder.
- If you wish to change the colour of the Android border please can you make the change in the “Colour iOS border layer”. As this is a gradient fill, to achieve a solid fill you will have to match the colour at both ends of your gradient (see notes below on changing the gradient fill).
For the DK logo
- Please do not change the size or position – unless this is for a “sub brand” using an existing logo lock up (see accompanying design notes – App_Tile_Guidelines_8.7.16.pdf – for guidance)
For your individual design
- Please place this in the “design in here” folder.
- Please note that this is set up so that the iOS and Android borders sit on top of your design. If you wish any part of your design to breakout into the borders, this will have to be done manually.
- Please also note that, although design elements can sit on top of the border, they should not bleed beyond the border as this will prevent the marketing version of the tile from being created correctly.
Once the app tile design is finalised and approved, pass the completed PSD back to your digital producer for processing to produce the final PNG assets using the relevant PSD action.
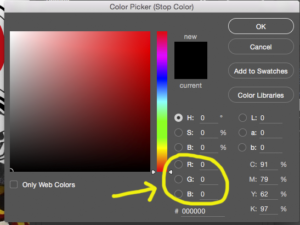
Using the gradient fill
To change the solid colour of the border areas please follow these steps.
- Double click the colour you wish to change.
- In the resultant pop-up double click into the gradient colour box.

- In the resultant pop-up, adjust the colour at either end of the gradient by double clicking in the areas indicated.
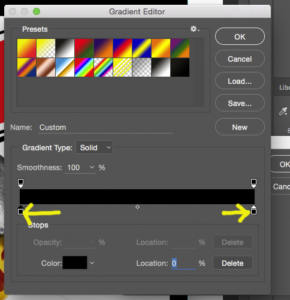
- Enter the required RGB values as indicated below.
Processing the PSD file to create assets (digital producer)
This process should be carried out by the digital producer.
- First, download the Photoshop action “App tile export.atn” here, double-click on it and it will automatically be added to your Photoshop Actions.
Go to Window > Actions.
Once on the actions palette, open the menu options and select Load Actions to import. - Once the action is loaded, open your psd app tile document, select the action and run it.
- You will receive a pop-up giving some instructions on how to use the template. Read this then hit continue.
- Photoshop will then generate three new psd files, one each for the iOS, Android and Marketing versions.
- For both the iOS and Android versions crop off the extra canvas space so you are left with just your logo. This is done by hitting Image > Canvas Size then entering a width and height of 1024×1024 pixels. The canvas should be retained for the marketing version as this contains the drop shadow.
- All files can then be saved as PNGs retaining transparencies.