Cutouts
Introduction
Masking requirement
Unless stated and where possible, if an image contains any alpha channels or masks, please keep these and use descriptive naming such as cutout, retouch…, colour etc, depending on the result.
Above, is an example of a mask hiding the white background of an image so that it becomes transparent. Instructions on making a mask in Photoshop can be found further in this document.
What are masks?
Masks are single channel (or greyscale) images that can be created with fills, brushes, selections and tools. Black, white and grey areas hide and show a layer in a non-destructive way. In other words, a mask can remove parts of a layer without deleting any pixels, those pixels are just hidden by the mask.
Attaching a mask to a layer affects only that layer and not the entire image. Several layers can each have a mask to create a montage.
Because the mask is editable, hidden pixels can be brought back into view at any time by editing the mask. The original image on that layer is not changed or affected in any way.
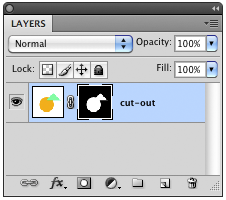
The example above shows the layer called ‘Layer 1’ with its contents in the left thumbnail and the mask in the right thumbnail. The link symbol between the two thumbnails indicates that the position of both are linked to each other.
Masks or Clipping paths?
There are advantages to both masks and clipping paths depending on the type of image.
We recommend that for simple, defined edged (ie not furry or blurred), small objects, that you use clipping paths. For more complex, undefined (ie fury, hairy or out of focus) objects, that masks are used.
Other factors may change your choice, like the style of the cutout or the background on which the cutout is being placed. For advice or help on this, please contact your CTS.
Clipping paths
Unless stated and where possible, if an image contains any paths (cut-outs), please retain these.
The ideal setting prior to creating any path in Photoshop should be “Exclude overlapping path areas”.

If you are saving the path as a clipping path, leave the Flattness of the device pixels box as blank. Any complex paths, should be simplified where possible. Please use descriptive naming for the path.
How Photoshop masks work
As mentioned before, masks are single channel images, displayed as greyscale.
- Black – Hides the contents of that layer
- White – Shows the contents of that layer
- Grey tones – a mixture of both, partially hiding the contents of that layer to produce opacity levels
You can tell weather the mask or the original image is selected by a black border encompassing the thumbnail
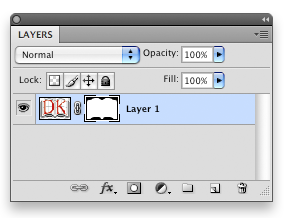
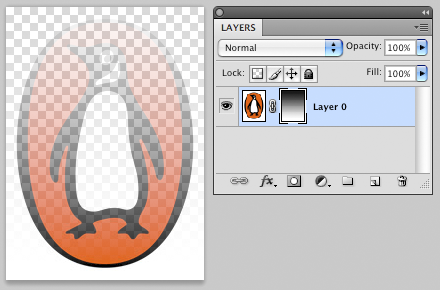
The example above shows ‘Layer 0’ with a mask attached to it. The mask is white which indicates that no pixels are hidden.
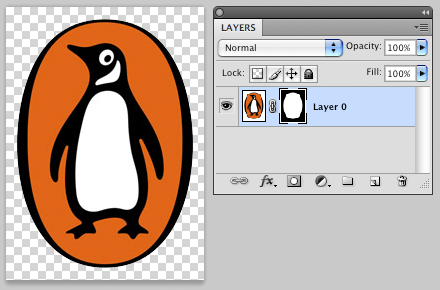
This example shows the mask is hiding the background of the logo and displaying transparency (checker board). The original image thumbnail is unchanged, but the mask thumbnail shows that the background is hidden using black fill.
This example shows that the mask thumbnail is a gradient from black to white. This results in the original image changing from transparent to opaque.
Creating the mask
Approach
The shape of the mask depends on your approach to the object. You can either;
- Create and edit the shape of the cutout first, then apply a mask (this should be used in conjunction with a ‘Quick Mask’. Photoshop will automatically fill in the selected areas of the mask to hide and show parts of the object. Small changes to the mask may be necessary.
- Create a mask which Photoshop leaves as blank (white), then create the shape afterwards. More editing is required using this approach, but the masks results are visible sooner.
Either way, to create the shape for a cutout will require a selection.
Selections
We recommend that the quickest way to create a selection (displayed with a dotted line) is either using the Magic Wand tool in the Tools palette, Selective Colour menubar option, or drawing it by hand using a Brush in the Tools palette. Further information on these tools can be found in the Photoshop Help menu or ask your CTS.
The above methods require you to create a shape for the mask using your ability to define what is and isn’t required for a cutout.
Visibility control
The visibility of the mask can be controlled using the following key combinations and clicking on the mask thumbnail;
Alt key + click on the mask thumbnail
Shows only the greyscale mask for editing
Cmd key + click on the mask thumbnail
Hide / Show the the mask applied to the original layer
Shift key + click on the mask thumbnail
Select the transparency or shape of the mask